Updating Autohandbrake
A few years ago, I was ripping a large collection of DVDs, but I found the standard open source tool, Handbrake, to be very fiddly especially when ripping multiple episodes from the same disc or set of discs. To make my life a bit easier, I wrote AutoHandbrake, a script which attempts to identify whether a disk contains a single long title (likely a movie) or several similar-length titles (likely a set of episodes), then assists with naming and numbering the resulting files. The heavy lifting is done by HandBrakeCLI, which reads, rips and encodes the videos.
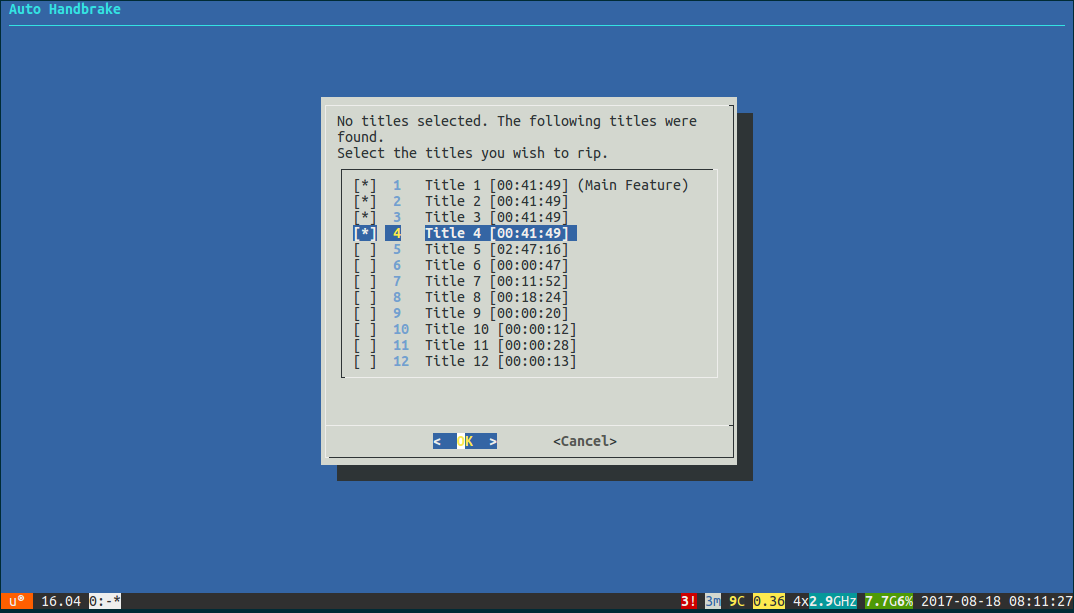
Since I wrote the tool, things have moved on a bit. DVD manufacturers often employ various tricks to bamboozle rippers: adding dozens of tiny titles, duplicate titles, putting titles in strange orders, or other tricks to make it hard to tell which titles you want to rip. At the same time, the rising populatity of Blu-Ray means that the HD version of a movie or show is often only a few quid more than the DVD, and even less when buying second-hand.
Both of these have led me to change my workflow when ripping disks. MakeMKV is not only capable of ripping Blu-Ray disks as well as DVDs, but has much smarter algoithms than mine for working out which titles on a disk are the ones you actually want. MakeMKV doesn’t do encoding, so I still rely on Handbrake to encode the ripped files and save on disk space.
This has required some changes to AutoHandbrake. I have added a new --directory option which allows it to by pointed at a directory of titles that have
already been ripped by MakeMKV, rather than pointing it at a disk itself. In this case, it will list the files and treat them as a movie (if a single file)
or a set of episodes (if multiple files), and use HandBrakeCLI to encode them as before.
As well as fixing a few bugs on the way, I discovered that gdialog which I use to provide GUI dialogs has been replaced with a wrapper for
Zenity, a similar tool that doesn’t interface with the rdialog gem quite so nicely. I hope to find
time to improve this, probably by detecting if we’re in a graphical environment and using a Ruby Zenity gem instead.
I also found that HandBrake is now using Flatpak as its primary means of distribution on Linux. This meant modifying the commands use to rip and encode titles. While it will still support using the HandBrakeCLI command however it is installed, it will prefer to use the flatpak using flatpak run --command=HandBrakeCLI fr.handbrake.ghb, unless you specifically tell it not to with --no-flatpak.
You can find AutoHandbrake on my GitHub page, and I will mention future developments on Mastodon.
Missing Linux save games on Steam Deck
I recently recieved my Steam Deck, and I have realised an odd quirk when installing some of my games. I’ve doing all my PC gaming on Linux for a long time, so when I installed Pillars of Eternity to carry on my current playthrough, I was a bit surprised to find that none of my save games were showing up.
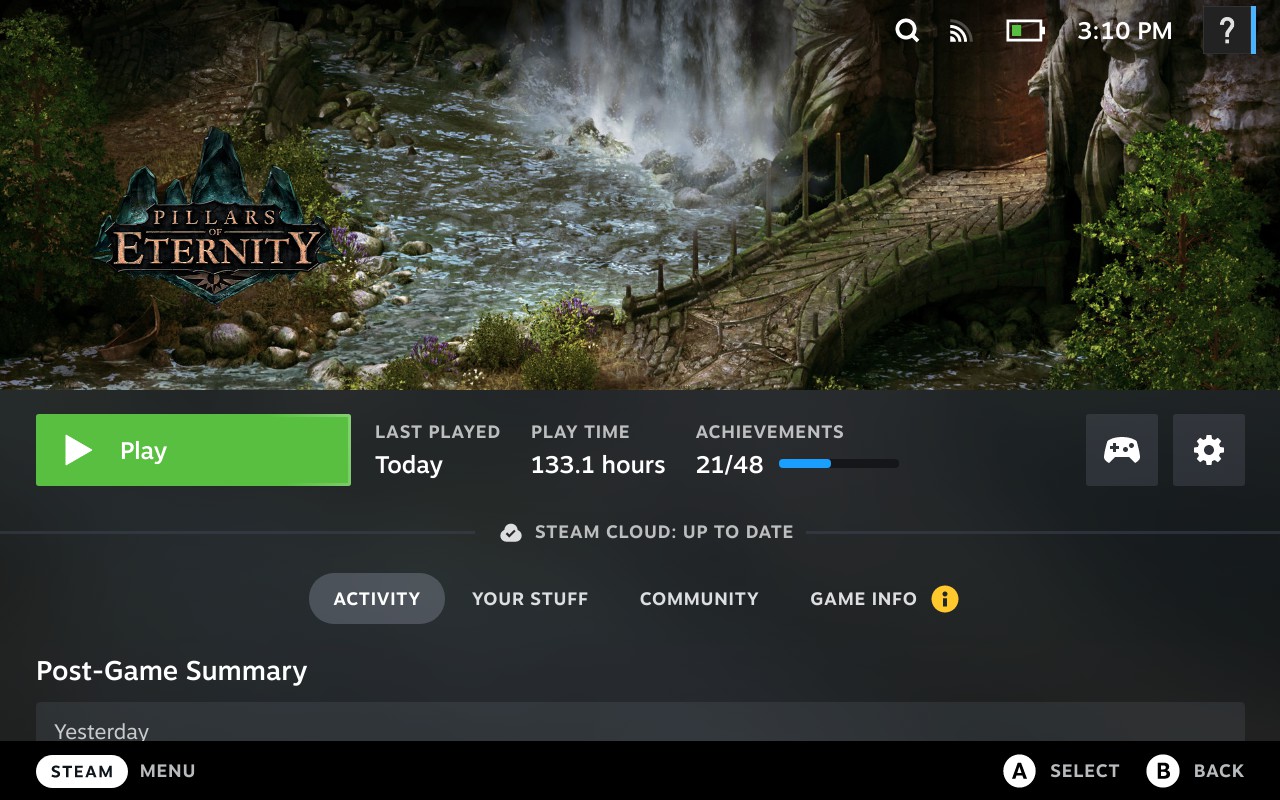
I checked that Steam Cloud was working, and it told me that it was in-sync. I checked on the filesystem at .local/share/PillarsOfEnernity, and there
were my savegame files, as they should be, but the game wasn’t seeing them.
I tried creating a new save game, quit and reloaded, and the game found it fine. What was going on?
The answer came when I tried searching for .savegame files in my home folder:
(deck@steamdeck ~)$ find . -type f -name "*.savegame"
...
./.local/share/PillarsOfEternity/SavedGames/cbd27084-3c24-4566-a371-ab09b4c175f2 quicksave.savegame
./.local/share/PillarsOfEternity/SavedGames/e21b6851-61ce-478a-8a0c-6392aa40cdf5 autosave_2.savegame
./.local/share/PillarsOfEternity/SavedGames/e21b6851-61ce-478a-8a0c-6392aa40cdf5 autosave_0.savegame
./.local/share/Steam/steamapps/compatdata/291650/pfx/drive_c/users/steamuser/Saved Games/Pillars of Eternity/cceab8afef9c4e4cbc58904c0f8d9667 7656277 Encampment.savegame
./.local/share/Steam/steamapps/compatdata/291650/pfx/drive_c/users/steamuser/Saved Games/Pillars of Eternity/cceab8af-ef9c-4e4c-bc58-904c0f8d9667 autosave_0.savegame
There were all my old save games in ./local/share/PillarsOfEternity, but my new ones were under a a completely different path. drive_c is the clue here,
it’s under a WINE prefix! Checking the game’s files confirms that I’ve got the Windows build of the game installed, running under Proton.
(deck@steamdeck ~)$ ls -l .steam/steam/steamapps/common/Pillars\ of\ Eternity/
total 15624
drwxr-xr-x  2 deck deck     4096 May  8 14:47 Docs
drwxr-xr-x  2 deck deck     4096 May  8 14:47 EmptySteamDepot
-rwxr-xr-x  1 deck deck   188416 May  8 14:46 GalaxyCSharpGlue.dll
-rwxr-xr-x  1 deck deck  3824640 May  8 14:47 Galaxy.dll
drwxr-xr-x  2 deck deck     4096 May  8 14:47 Links
drwxr-xr-x 10 deck deck    20480 May  8 14:48 PillarsOfEternity_Data
-rwxr-xr-x  1 deck deck 11632128 May  8 14:39 PillarsOfEternity.exe
-rwxr-xr-x  1 deck deck   187584 May  8 14:47 steam_api.dll
-rwxr-xr-x  1 deck deck        6 May  8 14:47 steam_appid.txt
-rwxr-xr-x  1 deck deck   126976 May  8 14:47 SteamworksNative.dll
One solution would be to copy the old saves into the WINE prefix, meaning the Windows build should see them. This assumes that the Linux save files are compatible with the Windows version of the game, so your mileage may vary.
Forcing Steam Deck to install the Linux build
The other solution which I have found works well for the games I’ve tried, is to force Steam to install the Linux build, rather than using Proton.
To do this:
- Find the game in your Steam library, go to the “cog” icon on the right, then select “Manage > Uninstall”.
- Click the “cog” icon again. Go to “Properties > Compatibility”.
- Check “Force the use of a specific Steam Play compatibility tool”.
- Select “Steam linux runtime” from the list.
- Go back and install the game again. You will now have the Linux version installed.
Why is this happening?
It came to me as a surprise that games with a native Linux build would have the Windows build installed by default. Especially as this isn’t true for all games. In my brief experimentation, I found that Pillars of Eternity and Nuclear Throne both behave this way, but Wildermyth does not, and installs the Linux build by default.
One possibility is that the former 2 games have a Steam Deck Compatilbity rating, where Wildermyth does not yet. Valve have undertaken a big task in testing the Steam catalogue for Deck compatibility. As many games they are testing require Proton, they may have decided to do all their testing via Proton, and once they have verified a game it will default to the version of Proton it was verified on.
This does make me curious about Valve’s strategy for Linux compatibility. I has assumed that Proton was intended as a gateway to show developers that Linux was a viable platform, to encourage them to produce native builds. But, if “Steam linux runtime” is just one on a list of compatibility tools, and Proton is the default, maybe the strategy is instead to make Proton the preferred option for running games on Linux?
Software RAID on Ubuntu 20.04
I recently decided to rebuild my HP Microserver, replacing the NAS appliance I use with extra disks in the microserver configured as a RAID 5. There are various guides online for the commands to set this up manually with mdadm, but as part of the rebuild I upgraded the Ubuntu OS to version 20.04, which presented a much nicer option. Following the upgrade, the login prompt included a message directing me to a web console at https://hostname:9090, which is using Cockpit.
Setting up RAID with Cockpit
Cockpit provides a modern web interface for a number of common but complex server administration tasks, including setting up networking and storage devices. Logging in an navigating to Host > Storage will provide a comprehensive overview of disk I/O, mounted filesystems, available devices, and more.
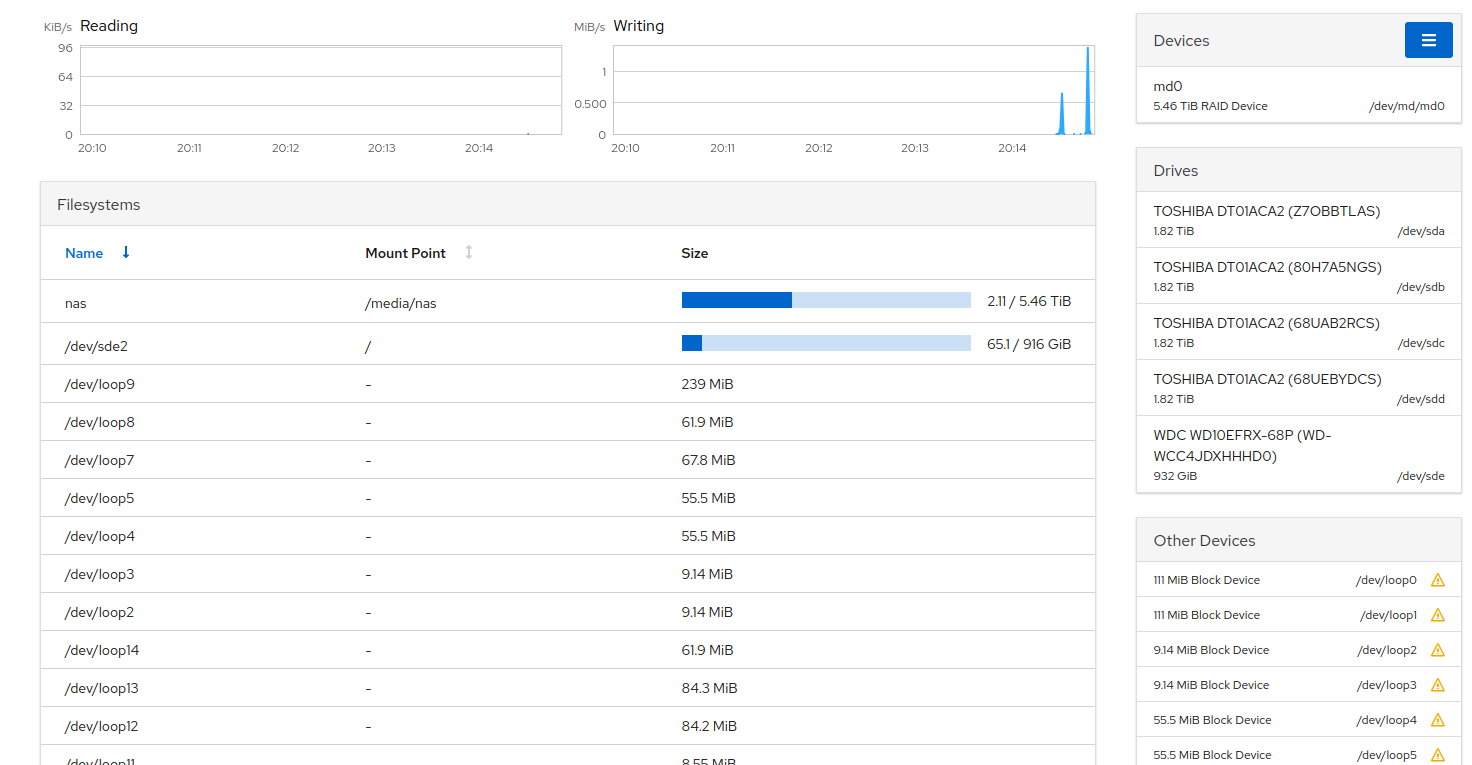
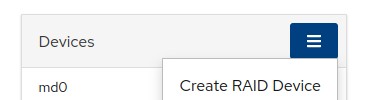
Creating a RAID with Cockpit is very straightforward. From this screen, click the hamburger menu by the “Devices” heading, and select “Create RAID device”. You’ll be prompted for a name, the RAID level, and a chunk size, then you simply check the boxes next to the drives you want to use, and click “Create”. Drives that are already in use won’t be listed, so no need to worry about accidentally formatting the wrong drive.
Once the RAID is created, you will see the progress of its set-up job. This may take several hours depending on the size and set-up you are creating, so you can check back on this page to see how it is going. While this is going on, you can also use cockpit to create your filesystems.
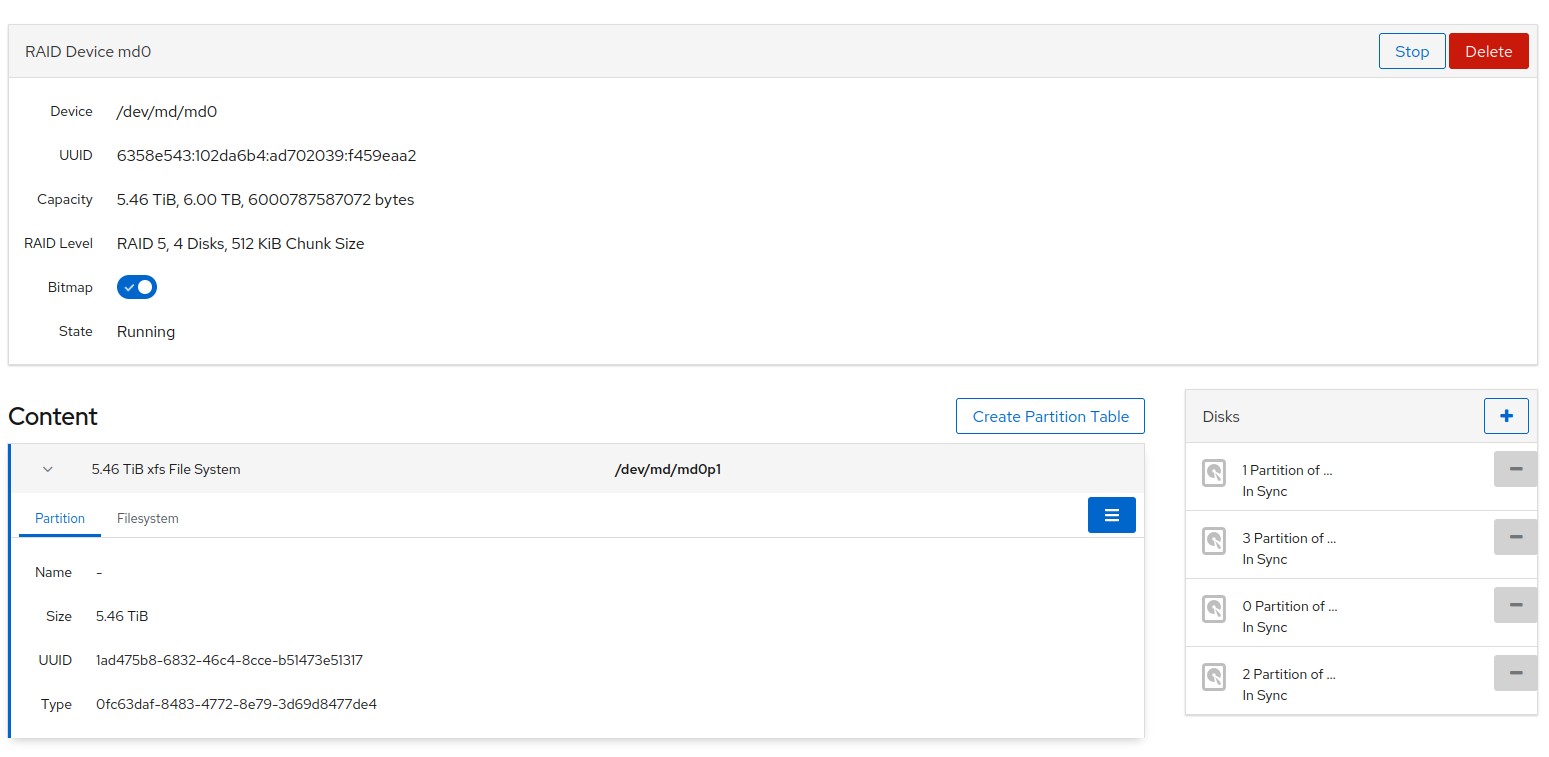
Click on the newly created RAID device and you’ll see a page listing the configuration, disks, state and content. The new device will be empty, so clicking “Create Partition Table” will let you define your new partitions in a similar manner to a graphical partitioner like GNOME Disks or gparted. In my case I followed the defaults and created a single XFS partition, but you may want to set up multiple partitions, LVM, or LUKS-encrypted partitions, which are all supported. You can also mount the new filesystem right from the web console.
Under the hood, this is all using mdadm, for which the Arch Wiki RAID page provides lots of in-depth information on configuration and maintenance, but for basic set-up and monitoring, this web console is all you need.
Cockpit has set a new bar for me in linux server administration. It’s a massive step up in terms of discoverability, and making those complex operations a lot less scary. I look forward to using it more in the future.
subscribe via RSS