My Steam Box - Hardware
Having played with SteamOS for my last post, I decided that it would be a lot more fun if my gaming PC, rather than being in my spare room connected to a small screen, was in my living room attached to my big TV. In addition to this, I had several devices under my PC to provide me with various media-viewing functions (streaming services, DVD playback, TV), which was a pain and took up a lot of room. To this end, I elected to build a box which could do all these jobs in one. I’ve now got the box in a “stable” enough state that I thought it time to write about it, starting this post with the hardware.
Innards
I started the build by cannibalising the insides of my existing gaming PC, which I’d upgraded not long ago. This gave me a starting point of an AMD A8 APU (quad-core with integrated 3D accelerated graphics), 8GB of RAM, a motherboard along the lines of this one, and a 240GB SSD.
It also gave me a very noisy heatsink. This was a problem as a box sitting under my TV needs to be quiet. After some research I bought a Zalman CPNS8900 Quiet heatsink, which does a great job of cooling with minimal noise and a low profile, but takes up a lot of horizontal room around the processor. So much, in fact, it lent against one of the RAM DIMMs.
To solve this problem along with screen limited resolution due to my TV’s poor VGA support, I upgraded my motherboard to An AsRock FM2A88M Extreme 4+ which had 3 key features: the FM2 socket for the processor, an HDMI port to ease connection to the TV, and 4 RAM Slots, meaning I could move the 2 DIMMs away from the processor allowing room for the heatsink. As an added bonus, the stock heatsink mount was screwed on rather than using plastic toggle bolts at the old one had, making mounting the Zalman much easier than it had been as I could just screw it onto the existing back plate.
The final piece of the puzzle was a power supply. Again, I wanted something quiet so went for a Corsair CM430M which is 80+% efficient and has a 120mm fan. It’s also modular, meaning only the required cables need to be attached, so reducing cable management needs inside the case.
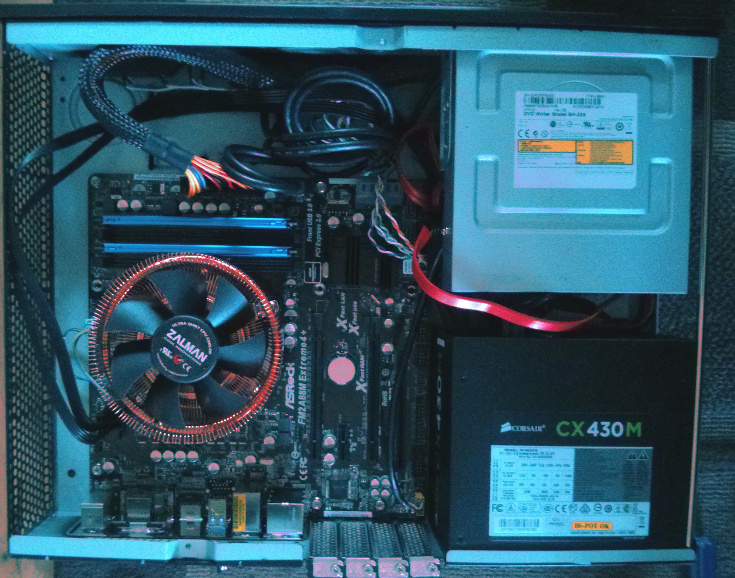
Obligatory internal shot, taken from above. The big power supply in the bottom right draws air from vents in the underside of the case and straight out the back, while the big heatsink on the left draws air in through vents above and out through vents in the side and back. Note the RAM slot nearest the heatsink is obstructed. Top-right is a short-depth DVD drive, with the SSD mounted underneath.
Case
When building a PC you can basically pick 2 qualities from powerful, small, and quiet. My main concerns for this machine were power (for gaming) and quietness, meaning I’d inevitably be building something fairly big. I plumped for a SilverStone ML03B – a half-height MicroATX case which isn’t the most beautiful case, but is really well designed and fits everything inside nicely. I’ve written a full review here.
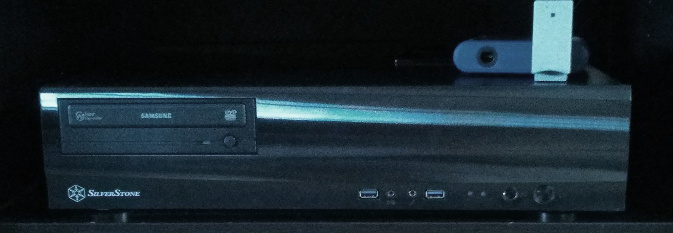
The completed steam box viewed from the front, with Gamecube USB adapter on top.
Controllers
I’ve always been a big fan on Nintendo controllers, I’ve still got a few Gamecube controllers as well as a couple of Wii Remotes. With the launch of Steam’s Big Picture Mode, Valve are encouraging games developers to make their games with well with gamepads. For those games, I use a Gamecube controller via a USB adapter (found via the Dolphin Emulator site). I’ve owned several Gamecube-USB adapters, but this one is particularly good, firstly because it has 2 inputs, and secondly because it’s the only adapter I’ve found which works with Wavebird wireless controllers.
For games designed to be used with a mouse cursor, I connect a Wii Remote using a bluetooth dongle and a USB-powered sensor bar.
I also needed a keyboard and mouse that I could use from across the room. There’s some nice IR remotes out there, but I went for the easy option and got a Rii Touch handheld keyboard with built-in touchpad. I initially bought a bluetooth model but bluetooth connectivity requires pairing the device and the OS to boot before it can connect, which wasn’t terribly smooth. I ended up with the proprietary RF version which connects as long as the USB port has power, and just appears as a regular wired keyboard and touch pad to the OS. It’s not perfect perfect but I’d give it 9/10 as a solution.
TV
While my TV has Freeview built in, I didn’t have a way to watch live HD channels. To enable this I bought a PCTV nanoStick T2, a USB DVB-T2 (Freeview HD) dongle. Notably, this is the only USB DVB-T2 tuner which has support in the Linux kernel at the time of writing, so it Just Works with no additional drivers needed.
Next…
That’s all for the hardware at the moment. In my next post I’ll look at how I’ve set up the OS and Steam.