Guru Plug - Part 1
A few months ago I pre-ordered a GuruPlug, GlobalScale‘s new plug computer, and the successor to the SheevaPlug.
I’ve been wanting to run a home server for a while, to act as a web server as well as performing a few other always-on functions, but I’ve not been willing to pay the cost of running my desktop 24/7. Drawing under 5 Watts of power, the GuruPlug satisfies this need perfectly.
On Friday I finally received an email telling me my GuruPlug had been shipped, and on Saturday it arrived in the post.
Specs
The idea of plug form-factor machines is that everything is housed in the plug, that is to say, a block about the size of a plug with an integrated power transformer. Think along the lines of an Ethernet-over-mains adapter.
In the GuruPlug Standard, you get:
- A 1.2 GHz Processor
- 512 MB of RAM
- 512 MB of NAND Flash
- Wifi b/g
- Bluetooth
- 1 GB Ethernet Port
- 2 USB 2.0 Ports
- U-SNAP I/O for home automation devices
In the “Plus” model, you get an additional GB Ethernet port, a MicroSD slot and an eSATA interface.
Packaging

Upon opening the bag the ‘Plug shipped in, I was expecting a nondescript corrugated affair to await me inside, but instead I was presented with a rather nicely printed box, with a satisfying magnetic catch holding the lid shut.
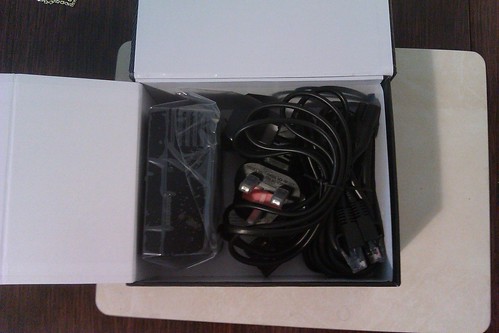

Opening up, the box contains
- The plug
- A 3-pin adapter for plugging directly in to the wall
- A 2-pin adapter for attaching a longer cable, if you want to sit the plug on a desk/shelf/etc
- Said longer cable with a 3-pin adapter
- A USB to Mini-USB cable (The Plug aparrently has a Mini-USB interface on the site, but with a non-standard connector and no adapter provided)
- A Cat5e Ethernet Cable
A notable omission from this contents list is any sort of setup instructions or documentation whatsoever. Not such a good start.
Size

Here’s a quick indication of the size – the unit’s about 10cm long, slightly wider and longer than a deck of cards, and about as deep as 3 stacked on top of each other.
Setup

Here the plug’s been assembled with the 3-pin adapter, ready to go.

I’ve hooked up the Plug to a 1TB hard drive in a USB enclosure, to allow me to use it for NAS/UPnP functionality. I’ve also plugged it into the router. As you can see it’s a cheap-as-free Netgear Special from my ISP, and the WiFi’s a tad dodgy, so while I could just connect the Plug wirelessly, I’d rather the security of the wired connection.

Powering on, you get a nice display of LEDs on the front of the unit. Lacking any documentation, I don’t know what any of these mean, by they look pretty cool. Also note the decision to print the logo such that it’s upside down when plugged directly into the wall.
It’s notable that the Plug is completely silent when powered on. Unfortunately I can’t say the same for the hard drive.
So the hardware set-up’s all gone pretty well. Join me in part 2 for the software setup!